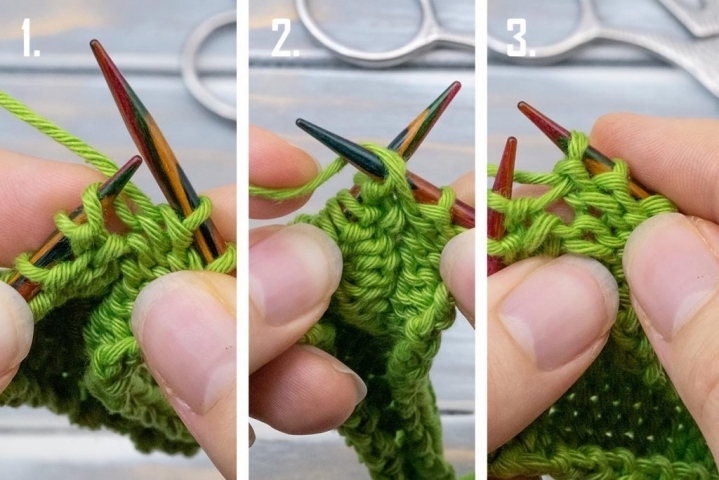
Unlike the standard technique, a yarn over knit backwards will not create an eyelet. In fact, it will create an increase that is structurally the same as a M1R – only a bit looser. Typically, it is incorporated in other, more complex knitting techniques. Jeny’s surprisingly stretchy bind-off is probably the most common example.
In knitting patterns, this stitch is usually abbreviated with “byo” for “backward yarn over” or – less common – “ryo“.
Anyway, let’s knit it together!
HOW TO KNIT THE REVERSE YARN OVER
How to knit the reverse yarn over
The reverse yarn over. Hi everyone, my name is Norman and today I want to show

MATERIALS
- Any yarn woks. I am using the Schachenmayr Catania Grande in this tutorial
TOOLS
- Any type of needle. I am using the Knitter's Pride Dreamz here
INSTRUCTIONS
- Start in the standard knitting position with yarn held in the back.

- Wrap the yarn around the needle clockwise. It more or less boils down to pushing the right needle against the working yarn.

- Secure the yarn with your index finger and insert your needle into the next stitch.

- Step 4: Knit the next stitch to secure the resulting reverse yarn over.

The next stitch is not part of the reverse yarn over. It's just required to secure it - otherwise, the simple wrap would unravel by itself.
HOW TO HANDLE THE RETURN ROW

The reverse yarn over creates a twisted loop around the needle. As a result, you have to take care in the return row or next round. The loop will be mounted on the needle twisted.
Still, you should purl it the regular way. This means you insert your needle from right to left all the same. This will twist the loop around and close the eyelet. If you were to purl the reverse yarn over through the backloop, you would untwist it again, resulting in a standard eyelet.
WHICH WAY DOES A REVERSE YARN OVER LEAN?

A swatch where I increased with a reverse yarn over on both sides 3 stitches removed from the respective edge.
Although it counts as a knitting increase, it is rarely used as such. Still, advanced knitters may ask themselves which way a reverse yarn over leans. Is it left- or right-slanting? If you take a close look at the swatch above, you can see that it creates a little bit more balanced increase line on the left side.
A reverse yarn over is right-leaning. This is not a big surprise as it’s nothing else but a deconstructed Make one Right (M1R). You can test this out yourself. If you lift the strand between two stitches the way you would for a M1R it will (or rather should) look exactly the same as your reverse yarn over as you knitted one stitch.
The only difference between the two stitches is the knitting order. A reverse yarn over will, however, be a bit looser as you create extra slack through wrapping, while for a M1R you steal yarn from the adjacent stitches.


